Measuring: an integral part of today’s production
By OEM Update Editorial August 3, 2021 6:53 pm IST
Since the beginning of complete machining, WFL has paid great attention to measuring workpieces in the machine and has developed cycle packages for a wide range of measuring tasks.
In order to reliably manufacture complex workpieces with high quality requirements, it is necessary to control the processes by means of a closed-loop process. The production of small batch sizes – sometimes only of individual parts – usually involves expensive blanks which are difficult to procure and can quickly be “wasted”.
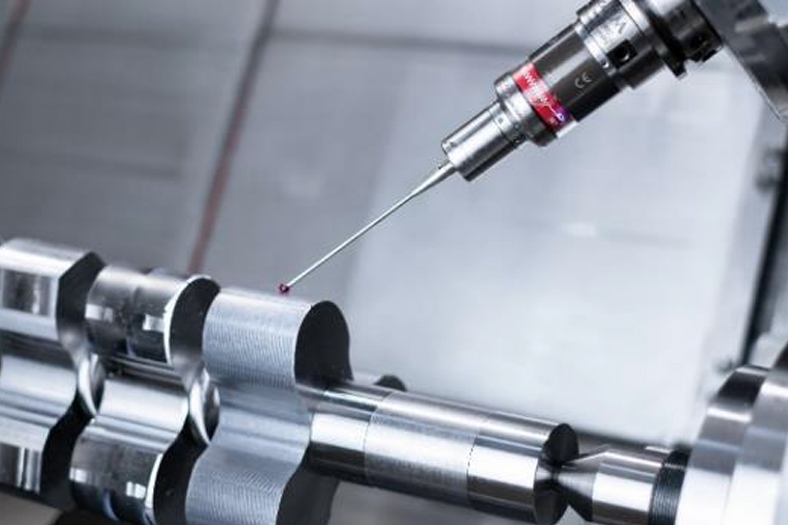
These measuring methods ensure highest manufacturing accuracy with tightest tolerances on complex workpieces. There is a wide variety of measuring devices such as switching measuring probes, scanning measuring probes or ultrasonic measuring devices.
Manual measuring versus automated measuring
In order to meet today’s requirements, measuring is an integral part of future oriented manufacturing processes. The closed-loop approach tries to create a simple and efficient cycle between the production system, machine, human and measurement technology. One of the most important aspects in this cycle is measuring during manufacturing processes.
Measurements can be carried out manually and automatically during a manufacturing process. With manual measuring, the operator is responsible for measuring and measurement data management, whereas the machine takes on both tasks in the case of automated measuring.
Manual measuring is still very important in today’s production, but it is increasingly replaced by rapidly developing innovative measuring techniques. At first glance, measuring equipment for manual measuring seems to be more affordable than modern measuring equipment, such as measuring probes. However, over a long-term production period, innovative measuring equipment and techniques are more efficient and cost-effective.
When using manual measuring equipment, random measuring errors must be expected. These occur with every measurement and are very difficult to find. Process interruptions, which are necessary to carry out measurements, result in longer production times. For this reason, only a low level of automation can be achieved. Since the tool correction is calculated by the operator, there is a higher error rate compared to an automated process.
All in all, the advantages of modern measuring technology, e.g., measuring with a measuring probe, outweigh any possible disadvantages in an innovative, automated production process. Automated measuring is playing an increasingly important role in the manufacturing process.
Thanks to the use of smart measuring equipment and techniques, a high degree of automation can be reached. This in turn leads to shorter production times. The process is no longer interrupted, there are fewer measurement uncertainties, and, in addition, one single measuring probe can be used for a wide variety of measurements. Innovative measuring equipment and strategies make Millturn complete machining centres even more efficient and versatile than before.
The measurement processes
Measuring probes have to be calibrated before they can be used for measurement. The calibration always takes place before the machining process and is carried out by the operator. The individual measuring points that were determined with the probe are evaluated after measuring. Various algorithms are available for analysis. The results are then evaluated, and a correction is calculated. Most of the time, a tool correction is determined based on the measurement results and automatically assigned to a tool via a WFL cycle. In addition, the individual results can be recorded, and a detailed analysis can be carried out at a later point in time.
Measurement strategies and possibilitiesThe right measurement strategy is crucial for a successful measurement process. The new generation of measuring probes offers extensive possibilities and should be part of every future-oriented, automated production process. Not only workpieces, but also complete contours and profiles can be scanned with the new measuring probes. This new and unique method unleashes an unimagined efficiency and versatility of WFL’s Millturn machines. WFL has developed its own cycles and measuring strategies for a wide range of applications in order to make the best possible use of the new generation of measuring probes and a Millturn.
Measuring strategies for the measurement of gears replace manual measurements by machine operators. The correction for the tool is determined automatically. This measurement process is essential for reliable gear machining and can be simulated with WFL’s programming and simulation software CrashGuard Studio.
Scanning measurement of roundness and axial run-out Since the exact deflection angle can be determined with new switching heads, the exact roundness and axial run-out can be measured on the workpiece, for example. For this reason, it can be checked before machining whether the blank meets the requirements. If this is not the case, either the program must be changed or the blank must be exchanged in order to avoid any machining problems. Since programs have flexible structures, they can usually be adapted automatically using a parameter program. In automated production, blanks should always be inspected in order to avoid problems and downtimes.
The new measuring probes can measure roundness as well as entire profile contours. WFL has developed measuring cycles and strategies for implementing highly complex measuring applications in one machining process. These cycles allow scanning any kind of profiles and calculating corresponding tool corrections. Therefore, different form milling cutters, which together create a contour profile, can be automatically coordinated via the WFL measuring cycles.
Surface quality can be measured with a new generation of special measuring probes. This means that any problems occurring during a machining process can be reacted to at an early stage, which avoids costly downtimes and scrap parts.
Thanks to the possibility of scanning profiles and evaluating the results, WFL has developed cycles especially for gearing technology, which, for example, allow measuring the flank profile or the tooth trace. Afterwards, the measurements are evaluated. The evaluations and protocols correspond to the general industry standard for gearing technology. Gearings can thus be checked and recorded after the machining process in accordance with industry standards. 4
Ultrasonic measuring
The ultrasonic measuring unit allows the measurement of the wall thickness of components. This method is used for long pipes or deep inner contours which can usually no longer be measured with a measuring probe. The wall thickness can be easily measured and evaluated by using WFL’s measuring cycles. For example, the centre error of an inner contour can be determined using the various evaluation algorithms.
“By implementing measurement methods, we are able to ensure and improve the quality of components. The automation of all measurement processes is an essential step to implement nearly or completely unmanned production processes.”
Contributed by:
Reinhard Koll, Head of Application & Project Engineering.
Cookie Consent
We use cookies to personalize your experience. By continuing to visit this website you agree to our Terms & Conditions, Privacy Policy and Cookie Policy.


