Speeding to Better Mould Finishes
By OEM Update Editorial May 14, 2018 11:56 am IST
Advanced cutting tools and complementary CAM toolpaths aim to do for finishing what they have already done for roughing.
Within this decade advanced carbide cutting tools used with constant chipload CNC cutting strategies have dramatically increased material removal rates for roughing of mould cores and cavities. Users report roughing cycle-time savings of 25 per cent to 50 per cent or more vs. conventional cutting strategies, while achieving dimensions closer to near net shape after roughing for a more favourable impact on subsequent finishing operations. As impressive as these roughing approaches have been, these strategies are rarely used for finishing cycles, which account for the bulk of the machining time required for most mould cores and cavities. More than anything else, reducing the time it takes to get a core and cavity feature down to the desired surface finish levels will significantly reduce CNC manufacturing costs for moulds.
For some time, cutting tool manufacturers and CAM vendors have been working together to dramatically reduce machine cycle times when using solid carbide tools for roughing. Now these partnerships are expanding into finish passes where automated CAM toolpaths are driving innovative cutting tool geometry and vice versa. One such example is the support of the new circle segment cutting tools found in Mastercam’s finish toolpaths. In many cases, this new tool support can dramatically reduce finish cycle times verses the use of more traditional ball end mills. Where these tools and automated cutting strategies can be applied, cycle time reductions ranging from 50 per cent to better than 80 per cent are being achieved routinely and with superior surface finishes.
Tool geometry makes it possible
Ball end mills have been the go-to cutting tool for surface finishing for decades. They are easy to program, and they can have good reach into tight areas of the part. However, for parts that require a great deal of surfacing, ball end mills are part of the problem rather than the solution when targeting better surface quality along with reduction in machine cycle times.
Ball end mills must be used with very small stepovers to reduce the size of cusps in the material. To compensate for this staircase effect and achieve the desired surface finish, a proportionally small stepover or stepdown, e.g. typically 3-5 per cent of the tool’s diameter) must be used. This improves the surface finish, but it reduces the amount of surface area engaged by the tool. Thus, the tool must take many passes to achieve the desired finish. The massive number of passes required to finish a part with a ball endmill accounts for why so much time is invested in finishing vs. roughing of cores and cavities.
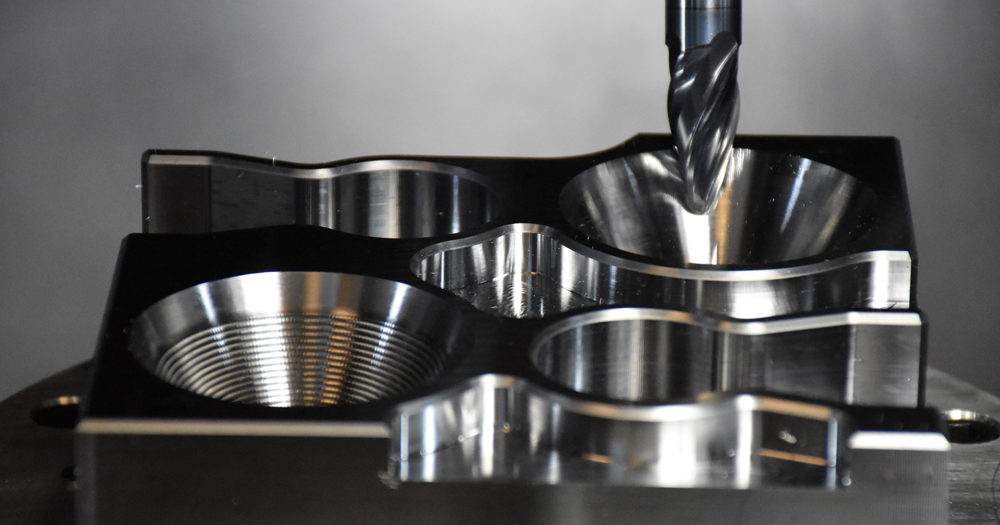
Circle segment cutting tools are designed to allow a small diameter tool to have a large effective cutting radius— many times greater than that allowed by the ball endmill. This design reduces the number of finish passes and the depth of the cusps in the material for a substantially better surface finish while achieving shorter cycle times.
The larger cutting radii of these tools (up to 187 times the cutting tools actual diameter) allow extended engagement of the tools with the material and reduce the number of stepdowns required to finish the part. For example, if it takes 30 passes for a ball endmill to finish a set of surfaces, it may take the circle segment tool six passes to do the same work and do it better. In this example, the 80 per cent reduction in the number of passes would translate into a comparable reduction in cycle time for that surface.
Software makes it work
Over the past two years four different circle segment tool shapes have come to market:
• Barrel-shape
• Oval form
• Taper form
• Lens shape.
During the evaluation process, toolpaths for high-efficiency finishing were tested extensively in the Mastercam Manufacturing Lab. Testing involved cutting an otherworldly, ten-surface demo part designed to provide at least two realistic applications for comparing the performance of each of the four circle segment tool shapes with that of a ball endmill.
It took the ball endmill 100 minutes and 34 seconds to machine all the surfaces in succession. Circle segment tools accomplished the same work in 30 minutes and 34 seconds. This represents an aggregate cycle time reduction of 70 per cent. In all instances, surface finish was demonstrably better.
Assessing the opportunity
What does all this mean to the individual mouldmaker? First, it is certainly not time to throw away your ball end mills. There are many surfacing applications where they are still necessary. On the other hand, for some parts and features dramatic finishing cycle reductions achieved with circle segment tools may be able to subtract numerous hours of CNC machining time from the types of cores and cavities you currently machine. Better finishes also lower costs by reducing manual polishing requirements.
The evaluation of this new finishing strategy is easier if you already have multi-axis equipment and the CAM software. It is a simple matter to select circle segment tools and insert them into a program you have already run and adjust stepover/stepdown to achieve a cusp height similar to the one produced by the old ball toolpath. (Minimal changes will also be required to obtain proper tool plane and tool axis control). Then simulate the program with feeds and speeds identical to the ones used previously for the ball endmill. This simple test of time comparisons is likely to be a real eye opener for many mould makers.
Circle segment tools and associated toolpaths constitute an emerging technology with so much potential for reducing manufacturing costs and lead times that mould makers cannot afford to overlook them.
Cookie Consent
We use cookies to personalize your experience. By continuing to visit this website you agree to our Terms & Conditions, Privacy Policy and Cookie Policy.


