Steering additive manufacturing industry to enhancement with CT & X-Ray
By OEM Update Editorial September 3, 2021 5:11 pm IST
Role of Computed Tomography (CT) in the additive manufacturing industry
Computed Tomography (CT) scanning technology is one of the most effective technologies that enable Non-Destructive Testing (NDT) of defects and flaws in additive manufactured parts with high accuracy and in detail. Manufacturers have integrated Industrial Computed Tomography (CT) in the additive manufacturing (AM) process to evaluate complex internal structures. This technology helps to maximise the potential of AM and accurately produce paramount components and assemblies.
Industrial CT is an excellent inspection method for metal additive parts and components from the automotive, medical implant to aerospace industries where a high degree of quality and reliability are critical. Incorporating CT in additive manufacturing economises the process compared to conventional methods of density determination. The main advantage of the CT technique is the non-destructive nature of the assessment: the dimensional accuracy and internal integrity can also be assessed, and the part can be approved or rejected based on pre-determined criteria depending on the criticality of the application without destruction of the component.
Benefits of adopting Computed Tomography (CT) technology into the AM process
It is self-evident that industrial Computed Tomography (CT) and X-ray technology makes hidden things visible. This opens up completely new possibilities in quality assurance and results in a significant added value for the customer.
- All one needs is one scan for full certainty: Measure, analyse, and inspect hidden defects and inner features.
- Owing to the X-ray technology, it is possible to see parts non-destructively and inspect within.
- By scanning all internal and external features with Computed Tomography systems (CT), parts can be reverse engineered even if no CAD model is available.
- Whilst 3D printing enables the production of parts in previously impossible designs, there is a need to inspect them, that’s where CT scanning comes in. As 3D printing allows the production of complex internal features, CT scanners provide a unique way to help quality inspect the accuracy of printed parts which will be used in production.
- CT scanning can detect potential part failures. Therefore, verification of mould flow using CT can be done along with fine-tuning.
SRT brings forth CT technology from ZEISS
Shree Rapid Technology (SRT) in association with ZEISS promotes industrial Computed Tomography (CT) technology in the Indian market. Industrial computer tomography (CT) gives an entirely new insight by making it possible to capture the volume of all internal features in next to no time. ZEISS is a pioneer in fast CT and enables the complete volume inspection of components during the production cycle.
Why Choose ZEISS CT Technology?
- Achieve Highly precise measurement analyses of complete components.
- Allows to measure characteristics which are covered, difficult to reach or are hidden without destroying the component.
- No complicated fixtures are required & Quick 100 percent inspections are made possible.
- ZEISS CT saves significant amount of time compared to contact and optical measuring processes and makes multiple part measurements possible.
Applications of ZEISS Industrial Computed Tomography (CT) technology
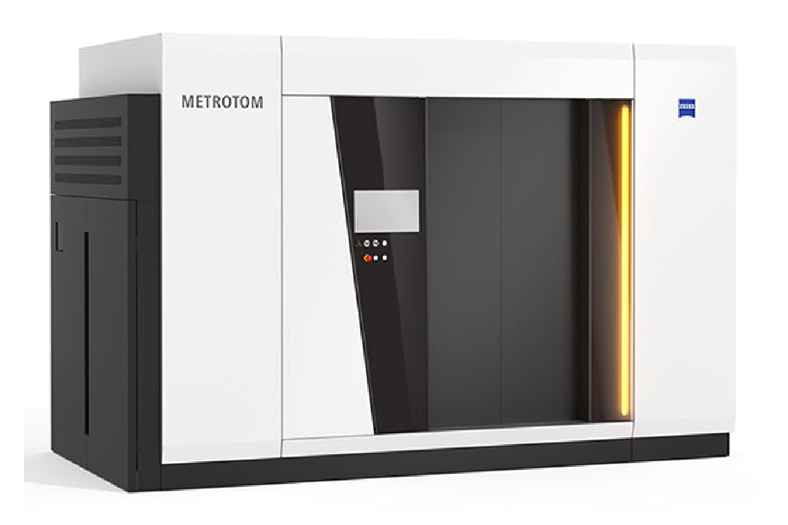
Zeiss MetrotomWith an industrial Computed Tomography system from ZEISS, successfully perform measuring and inspection jobs with only scan. The standard acceptance test, the precision engineering and the sophisticated calibration process ensure traceability of the system. Linear guide ways and a rotary table meet customers’ highest demands for precision.
The Zeiss Metrotom family has been offering reliable CT technology for quality control for several years now. The third generation of the computed tomography (CT) system Zeiss Metrotom 1500 provides the best proof that advanced and reliable X-ray technology is no longer a vision of the future. Zeiss Metrotom 1500 computed tomography system scans numerous component characteristics with a resolution of 3.5–6 μm and detector distance of 1500mm in one run. The resulting measurements are precise and traceable unlike contact measuring methods; ZEISS METROTOM is significantly faster when capturing numerous measuring points.
In the third generation, a new 3k detector generates 3D volume data sets with higher resolution, i.e., more voxels permitting the detection of smaller defects. Zeiss Calypso, the standard software for coordinate measuring technology, can be used for the metrological evaluation of Zeiss Metrotom CT data. The scan time can be reduced by up to 75 percent through different operation modes of the detector, while achieving a comparable voxel size as with a 2k detector. The DAkkS calibration which is the standard-compliant measurement of parts according to VDI/ VDE 2630 part 1.3 that eliminates the costs for multiple assessments is available for the ZEISS METROTOM 800 and 1500 series.
ZEISS VoluMax
ZEISS VoluMax CT systems are designed for applications where many components must be inspected quickly. ZEISS customises the machine and software to fit the inspection job. ZEISS VoluMax can be configured for both manual and automated loading. ZEISS VoluMax series detects and measures internal defects and structures with high speed and resolution of 3.5–400 μm that impacts on the quality, stability and functionality of the part or the product. ZEISS VoluMax F1500 Thunder, the first of its kind to be fully integrated into the production line, allows the fastest 100 percent inspection, detects defects reliably inside components without having to sacrifice maximum output.
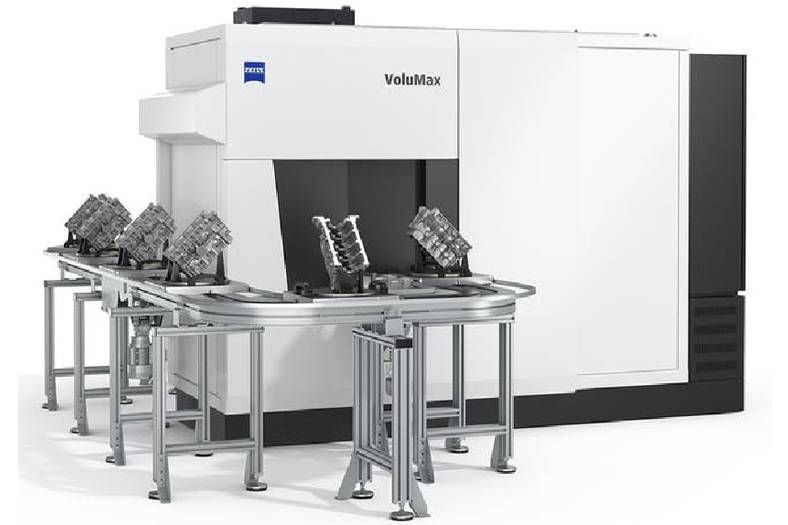
ZEISS inline CTs perform 100 percent of all inspections on manufactured plastic and light metal components in the production flow – even in harsh production environments. With ZEISS software, the ZEISS VoluMax CT systems can be used efficiently to their full potential. The ZEISS Automated Defect Detection (ZADD) software uses the CAD model to automatically detect, localise, classify, and evaluate whether there are any defects within the components that will impair their quality after processing. Defective components are automatically sorted out to save the costs of unnecessary further processing. The ZEISS PiWeb data management software recognises repeated occurrence of defects, which allows early intervention in the casting process and thus reduces scrap and costs.
Wide range of Applications
The ZEISS VoluMax systems are suitable for a wide range of applications. For instance, they are used to check the dimensional accuracy of plastic parts or to inspect cylinder heads for blowholes and sand residues. The computed tomography systems are used both in-line for 100-percent inspection and close to production for inspecting large sample quantities.
Future advancements in CT
Computed tomography (CT) scanners could play an even more important role in additive manufacturing in the future by providing detailed quality scans of printed parts for many industries. They are already being used to scan items for reverse engineering operations that use 3D printing. Customers will eventually push for greater use of CT scanning for quality control and validation as they take advantage of 3D printing capabilities.
For more information on ZEISS CT technology or machines, contact on www.shreerapid.com
Cookie Consent
We use cookies to personalize your experience. By continuing to visit this website you agree to our Terms & Conditions, Privacy Policy and Cookie Policy.


